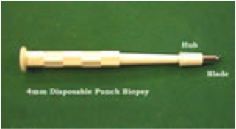
Punch Biopsy
This is a quick, convenient technique for full thickness sampling of skin lesions or inflammatory rashes, with the small resultant defect being allowed to heal by secondary intention or by suturing. The punch excision technique can also be used as one of a number of methods in the management of scars such as those caused by acne, and as a means of harvesting skin and hair for pinch grafts and hair transplants respectively. It is also a useful technique for fenestration of the ear cartilage to assist in the secondary intention healing of larger ear defects. Punch sizes range from 2mm to 10mm and come in disposable and non-disposable types.
It is always useful to mark the area or areas to be removed with ink prior to local anaesthetic injection. Tissue removed can be sent for histopathological examination, immunofluorescence, electron microscopy or culture.
When performing a biopsy, the dermatologist must choose the best technique and site to gain the most information with the smallest piece of tissue and this is very reliant on the experience of the clinician, which in turn is based on knowledge of clinical dermatology and appreciation of histopathology. A full thickness biopsy specimen is necessary for the diagnosis of most tumours, including malignant melanoma or when distinguishing keratoacanthoma from squamous cell carcinoma. Panniculitis and cutaneous morphea are two examples of inflammatory skin processes when a full thickness biopsy is also required when the punch biopsy technique can be used.
When the area for biopsy has been selected it is important to examine the natural skin tension lines in the area so that biopsy orientation can be facilitated. Ideally orientation of the excision should allow closure parallel to the natural skin tension lines. By stretching the skin perpendicular to these lines, the punch blade is placed on the skin and rotated under gentle pressure creating a circular defect, which on relaxation of the counter traction becomes an oval defect lying along the natural skin tension lines.
Technique
- Local anaesthetic is infiltrated into the pre-inked skin.
- Stretching the skin perpendicular to the relaxed skin tension lines between thumb and finger either side of the area to be sampled, the punch blade is placed on the skin and rotated under gentle pressure by rolling it between the thumb and finger using a twisting drilling action.
- One should penetrate to the level of the fat layer to achieve a full thickness biopsy specimen.
- The specimen will either float up on the fat layer or can be gently lifted using a skin hook or gently applied forceps to allow specimen collection by cutting through the fat layer using sharp scissors.
- Haemostasis can be achieved with direct pressure and/or interrupted sutures. Choice of suture material may vary depending on the area being biopsied, for example, silk or vicryl sutures may be more appropriate for a mucous membrane, whereas a non-absorbent suture such as nylon may be preferable at other sites.
- The resultant defect can be allowed to heal by secondary intention as an alternative method although optimal haemostasis and cosmesis as well as reduced healing time are usually seen with sutured wounds.
- Make sure the specimen is handled carefully to avoid crush artefact, which may make histopathological interpretation more difficult. If the specimen is to be divided, it should be done carefully with a sharp blade to give two full thickness specimens.
NB – When sampling the scalp always angle the punch in the direction of hair growth to minimise unnecessary follicular disruption. Patient aftercare instructions both verbal and written are helpful and arrangements should be made for removal of sutures if this is necessary with the appropriate practitioner.
